Charts
I love charts. They’re a great way to present a lot of information in a small space. But as much as I love them, I realize that they can seem a bit daunting if you’re not used to them. Once you get to know them though, they’re easy. The most important thing to remember is that charts show you a stylized picture of the right side of your work. Keep that in mind, and you’re halfway there!
The easiest way to get to know a chart is to work through a few examples. I’ll walk you through one of mine, but do keep in mind that this is a general example, and if your specific pattern tells you to do something different, do what the pattern says.
The first thing to figure out for any chart is if you’re working in the round or working flat. If you’re working in the round, the right side of your fabric will always be facing you, and you will read each row of the chart from right to left. If you’re working flat, the right side of the fabric will face you as you work one row, and the wrong side of the fabric will face you as you work the next row. You will read right side rows of the chart from right to left and wrong side rows of the chart from left to right.
It should say in the pattern whether the chart is worked in the round or flat. But in general, if the row numbers are all on the right side of the chart, you’re working in the round, and if they alternate between right and left sides, you’re working flat.
In the round
Charts worked in the round are the easiest, so let’s talk through one of those first. I recommend just casting on and walking through this example as you read about it. To do that, cast on 32 stitches, place a marker to indicate the start of your round, and join to work in the round. Then take a look at this chart and key.


Start by noticing that the rows are numbered 1-4. Row 1 is on the bottom, row 4 is on the top, and the rows are all numbered on the right. The columns are numbered 1-8. Column 1 is on the right, column 8 is on the left.
You’ll always start with row 1 (on the bottom) and work your way up to row 4 (on the top). Because you’re working in the round, you’ll always start with the column 1 (on the right) and work your way to column 8 (on the left).
Each symbol represents a type of stitch (like knit or purl). The key tells you what each symbol means.
It’s time to start knitting. Start at row 1, column 1, and read across the first row of the chart, from right to left, one stitch at a time, making the stitches in the order they’re shown. So row 1 will go like this.
Row 1: purl 1, knit 6, purl 1.
Repeat those 8 stitches across the whole first round of your knitting. Here that will be 4 times, because you’re working an 8 stitch repeat over 32 stitches.
Once you get back to your start of round marker, you’re ready to move on to row 2. Remember, this chart is for working in the round (you can tell because all row numbers are on the right side of the chart), so you’re always working a right side row. You don’t ever turn your work so the back side is facing you.
Row 2 behaves just the same way (read the chart from right to left).
Row 2: purl 1, yarn over, left-leaning knit decrease, knit 2, right-leaning knit decrease, yarn over, purl 1.
Repeat those 8 stitches across the whole second round of your knitting. When you get to your start of round marker, move on to row 3.
Row 3: purl 1, knit 6, purl 1.
Repeat those 8 stitches across the whole third round of your knitting. When you get to your start of round marker, move on to row 4.
Row 4: purl 1, knit 1, yarn over, left-leaning knit decrease, right-leaning knit decrease, yarn over, knit 1, purl 1.
Repeat those 8 stitches across the whole fourth round of your knitting. When you get to your start of round marker, go back to row 1 and start all over again.
Remember you’re always repeating the stitches in each row of the chart all the way across a round (so here you work stitches 1-8 as many times as needed until you finish the whole round, which is 4 times). Work through the chart from bottom to top and then start over again at the bottom (so here you work rows 1-4, then start over with row 1 and do it again).
That’s really all there is to it. Just take it one stitch at a time, one row at a time. Read the chart from right to left and from bottom to top, and you’ll do great.
Flat
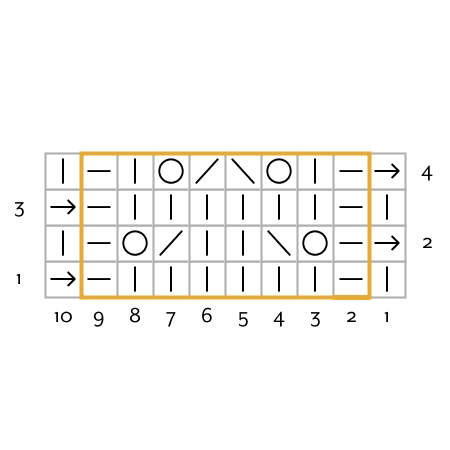
Charts worked flat have one extra thing to pay attention to, but it’s not hard! Once again, I recommend just casting on and walking through this example as you read about it. To do that, cast on 34 stitches. Then take a look at this chart and key.


This chart looks a little different than the one worked in the round.
You’ve still got 4 rows, but rows 1 and 3 have numbers on the left side of the chart and rows 2 and 4 have numbers on the right side of the chart.
The rows with the numbers on the left (rows 1 and 3) are wrong side rows. You’ll work them the wrong side of your fabric facing you. You’ll read that row of the chart from left to right. And you’ll follow the wrong side instructions (abbreviated WS) in the stitch key.
The rows with the numbers on the right (rows 2 and 4) are right side rows. You’ll work them the right side of your fabric facing you. You’ll read that row of the chart from right to left. And you’ll follow the right side instructions (abbreviated RS) in the stitch key.
This chart also has two extra columns (10 instead of 8), and the middle stitches (columns 2-9) are surrounded by a heavy border. The two extra stitches are the edge stitches, and the stitches surrounded by the heavy border are repeated over and over again to use up the stitches in your row.
This chart starts with a wrong side row. So on row 1, you’ll start at column 10 (you’re starting on that side because this is a wrong side row). You’ll read row 1 from left to right (again, because it’s a wrong side row). And you’ll make the stitch listed in the key for the wrong side of your work.
So, keeping all of that in mind, row 1 will go like this.
Row 1 (WS): Slip 1, *(knit 1, purl 6, knit 1), repeat from * until 1 stitch remains, purl 1
Row 2 is a right side row, so turn your work so the right side of your fabric is facing you. On row 2, you’ll start at column 1 (you’re starting on that side because this is a right side row). You’ll read row 2 from right to left (again, because it’s a right side row). And you’ll make the stitch listed in the key for the right side of your work.
Row 1 (RS): Slip 1, *(purl 1, yarn over, left-leaning knit decrease, knit 2, right-leaning knit decrease, yarn over, purl 1), repeat from * until 1 stitch remains, knit 1.
Row 3 is another wrong side row, so you’ll turn your work so the wrong side of your fabric is facing you. Then work row 3 exactly like row 1.
Row 3 (WS): Slip 1, *(knit 1, purl 6, knit 1), repeat from * until 1 stitch remains, purl 1
Row 4 is another right side row, so you’ll turn your work so the right side of your fabric is facing you. Then work row 4.
Row 4 (RS): Slip 1, *(purl 1, knit 1, yarn over, left-leaning knit decrease, right-leaning knit decrease, yarn over, knit 1, purl 1), repeat from * until 1 stitch remains, knit 1.
Remember you’re always repeating the stitches inside the heavy border as needed to use up the stitches in your round. Right side rows (which have the number on the right of the chart) are read right to left and use the right side notations in the key. Wrong side rows (which have the number on the left of the chart) are read left to right and use the wrong side notations in the stitch key. You work through the chart from bottom to top and then start over again at the bottom (so here you work rows 1-4, then start over with row 1 and do it again).
It’s very much like working in the round, you just need to read the wrong side rows of the chart from left to right and use the wrong side notation in the stitch key.
Sneaky bits
The stuff above covers about 95% of what you need to know to work most charts. Anything more complicated should be covered in the pattern. But there’s one more tiny thing that often throws folks the first time they see it. Every now and then, you’ll have a chart with some missing spots.

This happens when there are a different numbers of stitches on different rows (or when your fabric is getting narrower like at the top of a hat).
See how the chart has you increase 2 stitches on row 2 and then decrease them away on row 4? Having the blank spots on rows that have fewer stitches keeps things as lined up as possible. So in this example it keeps the purl columns lined up, even though the stuff in between them is changing shape.
Don’t worry about the missing spaces. You can just ignore them (yes, really!). You don’t do anything with your yarn or needles when you see them, they’re only a placeholder on the chart. Just let your eyes skip right over the blank spots, move on to the next stitch that has a symbol, and do whatever that symbol tells you to do.
Summary
I know charts can look daunting at first, but once you get the hang of them, they’re fantastic.
The most important things to remember are to start at the bottom row and work your way up, pay attention to whether you’re working a right side row or a wrong side row, and pay attention to how you repeat the chart. If your specific pattern tells you to do something else, always do what it says in the pattern, but those three things pretty much always hold true!
Mailing List
Want to hear when a new pattern comes out or something fun is going on? Sign up below!
Patreon
Want to support the content I create, get nifty bonus material for some of my favorite patterns, or get every new release delivered right to your inbox? Head over to patreon and sign up!